Tiny tiles pixilate José Orantes’ painting

I hope the mosaics adorning the Luther Burbank Playground seem to be magically adding color and sparkle to the concrete surfaces. So much thought, planning, research and effort happens behind the scenes to create this illusion 😉

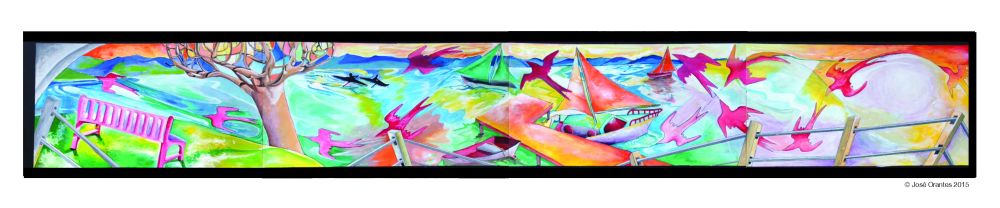
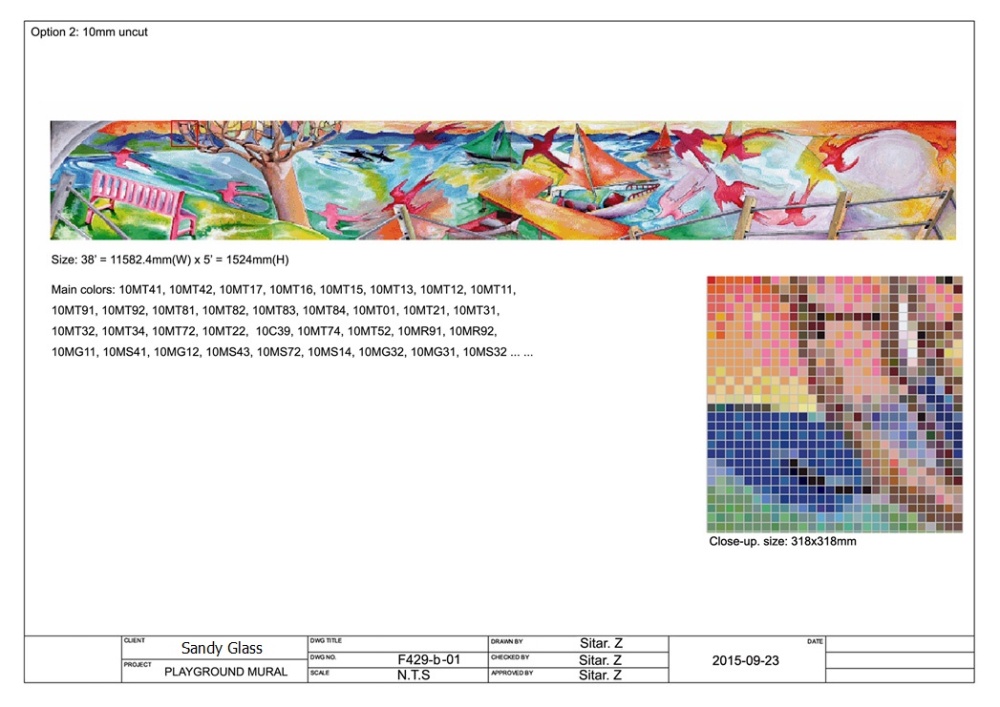
The 5′ high x 38′ long mosaic mural has been in the works since this project’s inception with José finalizing the painting nearly nine months ago. José can attest to the many sketches that preceded this gorgeous final painting!  Now, we’re anxiously awaiting the tiled sheets that we’ll be installing — a tiled version of Jose’s painting. This medium/technique will look pixilated up close but will visually come together like an impressionist painting from a further away.

~  Here’s a little information about the process ~

José Orantes’ original painting (in parts)

Christina at Hakatai  provided me a sample of a detail to show how it would look as a 10mm uncut mosaic mural. As you can see, the tiny tiles pixilate the painting but stay true to the beautiful colors and integrity of the painting.

F429-B-01Vendor mentioned in this post:
Hakatai Tile: 695 Mistletoe Road, Ashland, OR

Defining terms:
10mm uncut mosaic: The mosaic is created using the 1/4″ vitreous glass tiles as pixels in much the same way an impressionist painting uses unmixed spots of paint.

We’ll soon be receiving the boxes of the tiled mosaic along with the roadmap for its installation. Stay tuned for more…


One more mosaic mural to install

So happy to see the mosaics installations that were created with Mercer Island 3rd – 8th graders installed in the playground area of Luther Burbank Park. Thank you to the Mercer Island Reporter for featuring the project in a recent article: http://www.mi-reporter.com/community/385721121.html

The “Luther Burbank Playground Mosaic Enhancement” project includes one more mosaic mural that we plan to install in a few weeks. This one is a mosaic made out of 10mm (about 1/4″) vitreous glass tiles and created from a custom painted mural by artist José Orantes.

While we’re preparing to install this 5′ high x 38′ long mosaic mural. I’d like to share a little background… José Orantes created the original painting to scale. The painting is about 20″ high x 10′ long. Knowing the colors of the tiled mosaic mural would be matched to the range of colors available in vitreous glass tile, José and I purchased the paint from the Daniel Smith Art Supply Store in Seattle, in a palette of colors that could be replicated in the mosaic medium. We can’t wait to share the results!

 José Orantes’ original painting created for the Luther Burbank Park playground…

FinalOrantesMuralPaintingforLBP

We’ve already had the concrete wall where it will be installed made smooth by grinding away the texture and adding a smooth layer of cement. Here’s what the prepared surface looks like:

Looking forward to sharing more about this upcoming mosaic mural in the playground area soon. Stay posted 🙂

Vendor mentioned in this post:
Daniel Smith: 4150 First Avenue South,  Seattle


Grouted!

Grouting mosaics can be a little unnerving – the process requires that you smear grout over the mosaics so that it will color the cracks between the glass tesserae and bring the surface to a smoother, leveled plane. It also strengthens the mosaic. Fortunately, mosaics always are enhanced by the grouting process.

We chose a “pewter” gray color, a shade darker that “delorian gray” to grout our playground mosaics. The divided photo below illustrates how the grout enhances the mosaic.

Heather grouted with confidence! We were all thrilled with the results.

Thank you to Jose, Heather and Carole who took the lead to complete the grouting process on the workshop mosaics in the playground. 

I hope you’ll stop by the Luther Burbank Playground to admire the mosaics created with Mercer Island Students.

Please stay posted to this blog. My next post will introduce the 38′ x 5′ tiled mural based on a to-scale original mural created by Jose Orantes.

Detail work with Dental Pics

The Mercer Island 3rd – 8th grade students in our workshops would likely agree that creating mosaics is a detail-oriented medium. This attention to the details also applies to installing mosaics. We adhered our top-taped, hands-on mosaics using a specialized thinset adhesive made for glass installations. This product is a bright white so that all our colors of tumbled glass, including translucent glass, will sparkle. Before we can grout with our deep gray “Pewter” mortar, we use dental tools (Thank you, Collette!) to pick away at any white thinset that is at the same level as our tumbled glass and tile.

We truly appreciate our amazing  volunteers who made our mosaic dentistry fun and social experience. Some of our volunteers in action:

Werner picking

Werner picking away at the excess thinset.

We’ve been picking tirelessly. What a fabulous team!

Next post will share some grouted mosaics.

Installing another mosaic

June 16th, 2016:

Today we also arrived at 6:3oam to install our second mosaic mural in the playground. This mosaic fits perpendicular to the first one and is 34″ high x 5′ wide. Here are some photos to illustrate the installation process for mosaic installation #2.

We’re installing!

We met at the Luther Burbank Park Playground at 6:30am in the morning on Tuesday, June 14th and I’m grateful for my Starbucks coconut milk latte to drink on the way. Joe McCarty (joeTile.com) our tireless mentor and  cheerleader, met José and and I on our first installation day. Carole is also an integral part of our installation team.


How to mix thinset mortar

Supplies:

  • 2 buckets (fill one with water)
  • Thinset Mortar
  • stirring tools
  • Big Sponge
  • Trowels (Margin and v-notched)


Process:

  • Mix Thinset with water for 5 minutes (Peanut butter consistency)
  • Let Thinset REST for 5 minutes
  • Mix Thinset again for 5 minutes

We worked solidly from 6:30am – 1pm creating a plastic tent to protect our mosaic from the rain. We’re very pleased with our progress today. We’ll be installing the next one on Thursday, beginning at 6:30am.


So much preparation!


Before  the mosaics are ready to be installed, it’s necessary for all the pieces to fit together like a puzzle. Because we’re using thinset to adhere the top-taped mosaics to the concrete substrates in the playground, it’s very important to have everything ready to install and fitting together perfectly. Delays can allow the thinset to dry out enough to compromise the quality of the bond. This behind-the-scenes process is very time and detail intensive! 

First I prepared a portable palette of the tumbled glass and tile we used to create the mosaics. I want to be prepared for any repairs or adjustments needed during the installation process.

IMG_2825

Sandy’s tumbled glass palette.

Then I taped together all the pieces of the mosaic so that we could methodically divide the mural up into segments that would go back together logically so that any grout lines would look intentional.

These photos illustrate my process.

I feel much more confident installing when I know the mosaic artwork is ready!

Adding a tiled border for consistency

A tiled border around all the student mosaics is a unifying design element in our mosaic installation at the Luther Burbank Park playground. All of our mosaic murals are made out of tumbled or vitreous glass tile and we’ve consciously looked for ways to assure that our mosaics share consistent elements within the playground and also blend well with existing artwork in the park.

To create our border, I ordered custom-blended top-taped tile sheets then cut the 12″ sheets of tile into strips. The selected mix creates a random pattern of colored glass tile in a 3/4″ border. Our border’s mix is 30% Slate Blue, 30% Aquamarine, 30% Emerald and 10% Deep Blue, our accent color. 

My sense of aesthetics led me to move some of the colored tiles around
within the borders 
for more harmonious color transitions.

Adding the borders to the mosaics needs to be done with care so that the outside dimensions are accurate and the spacing between the tiles looks even. 


In case you’re curious about the math:

There’s about 144″ of tile border per sheet. 

3 mosaic student hands-on mosaics:
1.) 14″ x 300″
2.) 34″ x 60″
3.) 34″ x 70″

(300 x 2) + (14 x 2) + (34 x 4) + (60 x 2) + (70 x 2) = 1024″ (86 feet!)

For 86′ of border, I needed 8 sheets or  about 6 pounds of tile.


Our Troweling Lesson

As Joe McCarty, co-owner along with his wife Sarai, of JoeTile (www.joetile.com) will tell you, professional troweling skills are paramount to success as we get ready to install our mosaics in the Luther Burbank Park Playground. Joe and Sarai McCarty have been sharing their professional expertise with our project since its inception when I was figuring out the details for the proposal for the playground mosaic enhancements. 

Yesterday, May 22nd, Joe McCarty led a training session with Josè Orantes and I and a few of our amazing core volunteers.  Joe and Sarai arrived with all the materials and surfaces to teach us the tricks of the trade.

Troweling expertise, which Joe McCarty shared with our eager-to-learn group, is the key to the highest quality installation.  Joe taught us how to mix the thinset in a bucket for 5 minutes, letting it rest for 5 minutes then remixing, how to professionally apply a skim coat and techniques for using a notch trowel effectively to create the perfect ridges needed to permanently adhere the mosaics to the concrete surfaces.  I’ll be practicing and honing my troweling techniques in my driveway!

We are beyond grateful to Joe and Sarai for embracing our project.  Joe McCarty comes with a lifetime of professional experience and generously shared his knowledge with us to shorten our learning curve and hone our skills — priceless!

You might remember that in the September 2015, we closed the playground area so that JoeTile could safely grind and smooth the surfaces within the textured concrete to ready them for our mosaic installations.

JoeTileCardFront

It takes a village to mosaic a village

As our student mosaic artists, volunteers and also José Orantes and I can attest, creating mosaic art is a slow process. We’re working with tumbled glass and glass tile that is all less than one square inch. In fact, in order tho achieve the level of detail of these mosaic murals, our bits of glass tesserae are quite small.

José Orantes and I and a small group of amazing volunteers met this Sunday and last to fine-tune our student mosaic murals. This evening I can share the results!

We still have some more behind-the-scenes mosaic work to do before installation. I’ll share our next meeting times soon. Thanks so much, Sari, Roxanne, Libby, Jada and Samantha.