Josè Orantes and I have completed the installations of nearly 250 square feet of mosaics at the Luther Burbank Park Playground on Mercer Island!
One of the highlights of working in the playground for much of the Summer was meeting folks that stopped by as we were working. As we were installing the 5′ high x 38′ long mosaic installation above the playground, we had the pleasure of meeting professional photographer, Mike Frey.
Mike Frey has taken these fabulous images of the mosaic installation based on Josè Orantes’ painting. Please be sure to credit Mike Frey for these images.
Pre-grout photos taken by photographer Mike Frey:
Photo Credit: Mike Frey
Photo Credit: Mike Frey
Photo Credit: Mike Frey
Photo Credit: Mike Frey
Post-grout photos by Mike Frey:
Photo Credit: Mike Frey
Photo Credit: Mike Frey
Photo Credit: Mike Frey
Photo Credit: Mike Frey
Thank you Mike Frey! We love how you’ve captured the detail, colors and beauty of the mosaic installation.
In an earlier blog post I mentioned my preoccupation with expansion joints. These thin vertical joints in the mosaic are prepared by using 1/16″ pin striping tape and thin rope to designate clean lines that are filled with a flexible caulk (instead of grout) to allow for small amounts of movement within the concrete.
Soon after grouting , the rope used to protect each vertical expansion joint line is carefully removed and the gap is filled with the flexible caulk. We have installed 9 of these expansion joints that are now filled with caulk and nearly impossible to see in the finished mosaic mural.
There are four caulked expansion joints in the part of the mural where a crack in the concrete was repaired by Joe McCarty (www.joetile.com). Can you see them? (I can’t.)
Nancy taped on both sides of the expansion joint
Jose took care to fill each joint with caulk
We used a flexible caulk that perfectly matched our grout.
We’ve finished working on the mosaic mural of Jose Orantes painting “Birds in Flight.” Please bear with me as I share our last work sessions in which we focused on the details.
We knew tiling the hole would be complicated
Lots of detail work!
Tiles were cut one-by-one to fit
We took care to work from both sides
Here’s a detail…
Pleased with the results.
Tiling around and within the concrete wall was challenging and took a long time. Jose and I created a plan for tiling the angled and curved surfaces. We introduced a neutral gray 3/4″ glass tile inside the circular space with one row of the 10mm tile running dow the center. This design filed the width of the surface perfectly.
Working together, Jose applied the thinset glass adhesive to the surface and I carefully placed the tile all around the inside surface of the cutout. Along the top (upside down), I took care to install smaller pieces of the mesh-backed tile to assure that they would adhere. On the angled curved surface rows of four tiles were sliced so that the outer row near the horizontal tiled wall could be separated a little. The following day, I needed to fine-tune our work. We know how important it is for opening to be strong and also finely finished to avoid sharp edges.
For the horizontal plane to accommodate the circle cutout, nearly every tiny tile around the circumference needed to be cut on the appropriate angle. That was this detail-oriented artist’s challenge.
As you can imagine, many hours were spent working on this detail in the mural. The colors of 10mm tile used in the hole come from Jose’s design. He purposely incorporated a neutral area where the mural hit the hole. We used these tiles that got cut out within and around the hole!
Heather “muds” with expertise!
Nancy, Jose, Sandy, Heather
Nancy filling in grout and finessing.
Carole helps in so many ways!
I can’t mention enough how awesome our friends/volunteers are. Thank you Heather, Nancy, Bonni, Sari and Carole for your help with the hole and the final details!
José Orantes and I have continued the installation process of the mosaic mural for seven full work days since my last post. Most days we’ve met at playground at 7AM and spend about 45 minutes setting up our tarp canopies, organizing our tools and materials and making a plan for our day. These past few days, José has been grouting the parts that are ready and I’ve been doing the detail work. For folks that come by the wall once a week, our (slow, persistent) progress looks like magic. That’s just an illusion 🙂
The park is quiet early in the morning. This installation is feet away from the storage room that houses electricity and access to a water hose. It’s also right near the restrooms. The tarp tent feels like a home and provides shade. I’m sure I’ll miss the mornings working here in the playground. We’ve also had the opportunity to chat with folks that walk through the playground during these quiet times. We’re touched by their compliments of the mural-in-progress. It’s so nice seeing Janice Engvall who I knew from when my kids were a Lakeridge, walk by each morning with her husband. This week she said “I walk by every day and now instead of seeing the concrete, I’m watching the wall evolve into beautiful artwork!”
Here are some photos that illustrate our progress:
Jose grouting.
The pewter grout brings out the colorful tile.
birds fly around the curved concrete.
Love what grouting does!
Lots of detail work around the hole in the wall
Thanks also to some of our friends who stopped by to volunteer this week. Here are a few captured at work. Thanks also to Bonni, Sari and Kathy!
Libby and Samantha
Victor
In my next post, I’ll share some details about the detail work. Thanks for checking in.
We hadn’t taken a photograph of our end of week progress on Friday. In those five days of installing (José and I each worked over 40 hours!) we installed over 100 square feet of the mosaic mural (with care).
Our Monday (Day 6) began with set up: unpacking the supplies, laying down canvas tarps, rigging up our canopy to create shade and setting out the tiled panels on our gridded table. Work today included installing mosaics on the curve in the concrete wall. It was quite challenging to cut and maneuver the stainless steel Schluter to follow the curve, remain straight and close to the wall. José is a Schluter expert!
As we continue to install the beautiful tiled mosaic, there’s still detail work that needs attention. Thanks so much to Anu and Sari who helped us today. Thanks also to An for bringing by rags.
Schluter® – SCHIENE E45 is being used throughout our project to provide a strong stainless steel edging to all of the mosaic murals we’ve installed in the playground.
Wednesday through Friday have been sunny, dry, and warm. We’re grateful for the tarp canopy that provides some shade while we continue to install the tiled mosaic mural at Luther Burbank Park.
The dry warm and sometimes breezy weather causes the thinset to dry faster. José makes small batches so that our adhesive doesn’t dry out before we are able to install the panels of mosaics.
Making progress on the mosaic mural
Day 3: By the end of the third day of installing, we’re able to see Jose’s painting coming together in the tiled mural! We start at the bottom (E) and move up in a stepping pattern, taking care to maintain the 1/16″ spacing between tiles and using a small level to assure that the vertical and horizontal lines remain plumb.
The panels set out on the gridded plywood
now installed on the wall!
Installing Expansion Joints
In addition to painting a coat of RedGard® on the wall, we’re installing expansion joints to prevent damage from cracks in the concrete.The rope is removed after grouting. The space is then filled with a flexible caulking instead of grout to allow for expansion due to small cracks in the concrete.
Liking this pink rope for our new expansion joints
Series of expansion joints over the crack
Also an expansion joint ever 8 ft.
The mural continues to grow…
We continue to install about 35 -40 square feet each day during days 4 and 5 (8/11 and 8/12). Whew! Thank you to Carole for working with us on Thursday and for talking us to Master Wholesalers to buy more thinset in “Beastie” and to Libby for helping out on Friday.
Carole makes installing fun!
Creating a system…
More progress.
Love how Jose Orantes’ tree looks.
Thanks, Libby!
We’re taking the weekend off but will be back at 7AM on Monday! ♦♦♦
José Orantes and I are back at the Luther Burbank Park playground installing mosaics on the 5′ high x 38′ long concrete wall. Here’s the progress we’ve made on Monday and today working from 7 AM – 3PM.
~ Day 1 ~
1. Build Tarp Canopy for our workspace
Attaching the tarp with clamps
Undercover troubleshooting
Materials: ~ 16’ x 20’ tarp (cut into two to 8’ x 20’ lengths) ~ Four bar clamps to attach to the top of the concrete wall ~ Eight 1” x 2” wood strips to create structure. ~ Canvas drop cloth (9’ x 12’ cut to 4.5’ x 9’) to cover ground
2. Paint the wall with Red Guard to reduce cracking
We applied a coat of RedGard® to provide a flexible barrier between the concrete and the mosaic installation as a precaution to reduce the effects of cracks in the concrete. We’ll also be install several expansion joints in the affected area and every eight feet as recommended by tile experts.
Concrete crack
Red Guard goes on pink
… and dries to red
Materials: ~ 3.5 gallons of RedGard® ~ Rollers and extension rod ~ Paint pan and disposible liner ~ Tape to protect surfaces
Day 2
Another busy work day that included lots of measuring and remeasuring, creating a gridded prep table to set out our tiled mosaic art in position before installation, installing stainless steel schluter edging and beginning to install the mural.
1. Create Tile Prep Table
Our prep/set-up table is carefully measured, gridded and labeled to hold our mosaic panels in position before installing them onto the concrete wall. Numbers along the top are marked on blue tape so that we can update the columns as we move across the wall in our installation process. The letters A, B, C, D, E represent placement from top to bottom.
Adjustable numbers
Complete!
Materials:
~ Three work horses to hold plywood table ~ plywood cut and assembled to fit 5′ x 7′ of mosaics ~ Roller and paint pan ~ Primer ~ Ruler, pencils and Sharpie markers
The to-scale painting that José Orantes created over 9 months ago has been enlarged and reproduced onto mosaic mesh using 10mm (1/4″) glass tiles instead of paint. The 12.5″ squares of glass tile adhered to mosaic mesh was sent to me via UPS! It was so exciting and mind boggling to receive ten boxes, each weighing approximately 30 pounds, knowing that when installed on the 5′ high by 38′ long concrete wall in Luther Burbank Park (above the playground), the mural will come to life in a tiled, pixelated impressionistic work of art.
A portion of our installation “road map”
A detail from A-3
See how the “A3” tiled square matches up to its designated square on the “road map”? José and I are thrilled with the range of colors used to recreate the painting. Some are even iridescent!
~ Building in Longevity ~
Expansion Joints: We’ll install expansion joints every eight feet to protect the mural from movement that can occur within the concrete over time. This image (http://www.poolspanews.com/how-to/design-construction/special-report-glass-tile_o) illustrates how expansion jointsbetween the rows of tile is created by placing a flexible sealant where grout normally would go. The flexible filler should absorb stress and allow space for the tile to expand and shift without cracking.
We will paint a coat of Custom Building Products’ Red Guard on the concrete substrate prior to installing the mesh-backed tile as an additional precaution to prevent cracking.
Creating a tarp canopy:
Before we begin our work to install the mosaic mural, José has conceived a design for a tent that will shield our installation, materials and us (!) from the sun. We’ll attach a tarp to the top of the concrete wall using four bar clamps. 1″ x 2″ wooden strips will be built into the tarp to provide structure. While we work, the tent will provide shade.
When we are done working for the day, the tarps will be released so that our work-in-progress will be protected.
Materials: – 16’ x 20’ tarp (we will cut it to 8’ x 20’ – 4 bar clamps to attach to the top of the concrete wall – 1” x 2” wood strips to create structure.
I’m continuing to develop a checklist detailing the process and the supplies we need to bring to the site so we don’t forget anything. Here were go!
So happy to see the mosaics installations that were created with Mercer Island 3rd – 8th graders installed in the playground area of Luther Burbank Park. Thank you to the Mercer Island Reporter for featuring the project in a recent article: http://www.mi-reporter.com/community/385721121.html
The “Luther Burbank Playground Mosaic Enhancement” project includes one more mosaic mural that we plan to install in a few weeks. This one is a mosaic made out of 10mm (about 1/4″) vitreous glass tiles and created from a custom painted mural by artist José Orantes.
While we’re preparing to install this 5′ high x 38′ long mosaic mural. I’d like to share a little background… José Orantes created the original painting to scale. The painting is about 20″ high x 10′ long. Knowing the colors of the tiled mosaic mural would be matched to the range of colors available in vitreous glass tile, José and I purchased the paint from the Daniel Smith Art Supply Store in Seattle, in a palette of colors that could be replicated in the mosaic medium. We can’t wait to share the results!
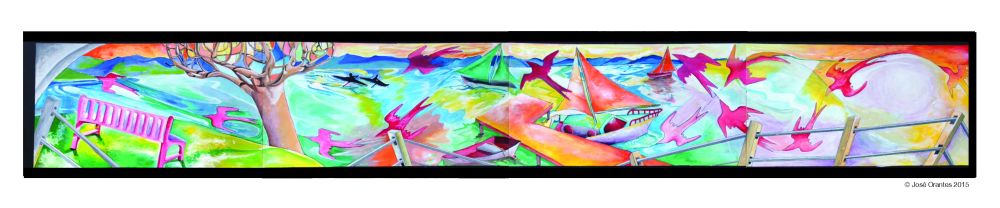
José Orantes’ original painting created for the Luther Burbank Park playground…
We’ve already had the concrete wall where it will be installed made smooth by grinding away the texture and adding a smooth layer of cement. Here’s what the prepared surface looks like:
Sandy inspecting the prepared concrete wall
The 5′ high x 38′ concrete wall above the playground
Jose’s canvas!
Looking forward to sharing more about this upcoming mosaic mural in the playground area soon. Stay posted 🙂
Vendor mentioned in this post: Daniel Smith: 4150 First Avenue South, Seattle
Before the mosaics are ready to be installed, it’s necessary for all the pieces to fit together like a puzzle. Because we’re using thinset to adhere the top-taped mosaics to the concrete substrates in the playground, it’s very important to have everything ready to install and fitting together perfectly. Delays can allow the thinset to dry out enough to compromise the quality of the bond. This behind-the-scenes process is very time and detail intensive!
First I prepared a portable palette of the tumbled glass and tile we used to create the mosaics. I want to be prepared for any repairs or adjustments needed during the installation process.
Sandy’s tumbled glass palette.
Then I taped together all the pieces of the mosaic so that we could methodically divide the mural up into segments that would go back together logically so that any grout lines would look intentional.
These photos illustrate my process.
The mural is divided and numbered
Adjustments are made to be sure that the pieces fit together without gaps or overlapping.
It takes a while to divide up the mural. I’m trying to have all pieces approximately one square foot.
The 34″ high x 70 ” mural divided into 13 parts.
The mosaic puzzle pieces all fit in a box for easy transport.
I feel much more confident installing when I know the mosaic artwork is ready!